EasyBadge: Installing and Set-Up
By James Kelly on February 7th, 2020
To use your EasyBadge software, you need to register it to the version you’ve purchased. To do this:
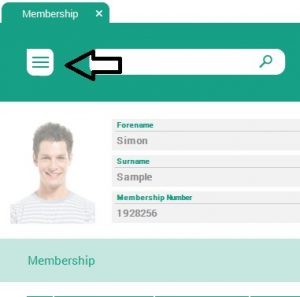
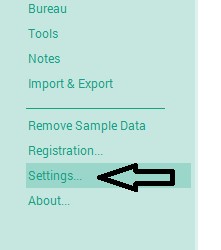
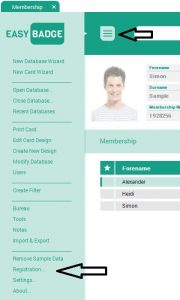
- Click into the main EasyBadge menu via the button in the top-left of the program screen.

- Click ‘Registration’ that can be found towards the bottom of the menu.
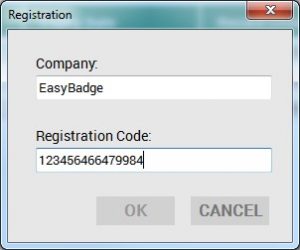
- Enter your company name and the registration code from the printed card supplied exactly as it appears.
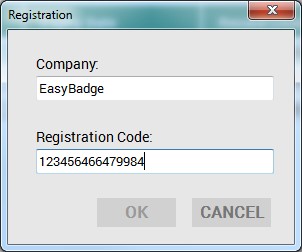
- Click ‘OK’ and then restart your EasyBadge software. The program is now registered.
The EasyBadge Bureau Dashboard allows you to easily see who is sending ID card data to you using the application across multiple databases. To use the EasyBadge Bureau, we’ll assume:
- You’re using the Bureau version of EasyBadge
- You’re using more than one database within the dashboard
- You’re having problems pairing codes for the databases you want to see in the dashboard.
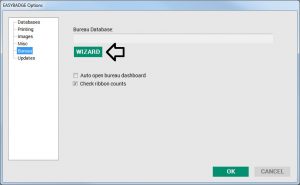
1. Click the Menu button. (Three lines top left)

2. Now click settings at the bottom of the menu and select the Bureau from the list and Click ‘Wizard’ as below.
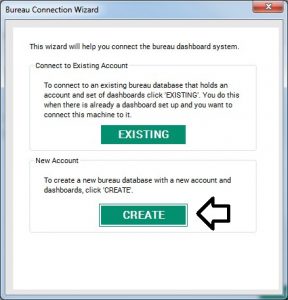
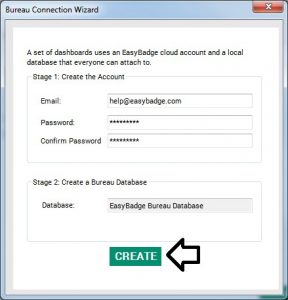
3. Next, click the ‘Create’ button.
4. Now enter a new email and password of your own. We recommend using a generic email and password like bureau@yourcompany.com rather than personal account linked to one person.
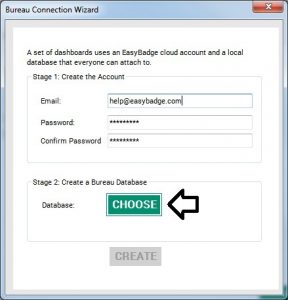
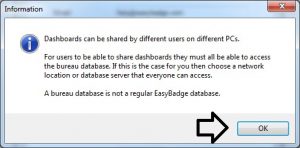
5. Click OK to this message. It’s important that the Bureau Database is held on a shared drive or location so that anyone that needs to can access it too.
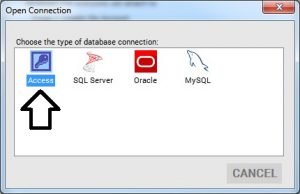
6. Now pick the database format you want to use for the Bureau Dashboard Database. Remember this database is a special database that holds information about the other EasyBadge databases you are using.
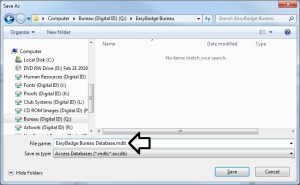
7. Give the bureau database a name and click ‘Save’ to save it into a folder on your network or PC where you know it will get backed up. This is important.
8. Now click the ‘Create’ button on the Bureau Connection Wizard Page to create the Bureau Dashboard Database.
9. After a few moments, the below message will appear telling you the Bureau Database has been created and the Bureau Dashboard is available to use.
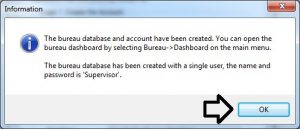
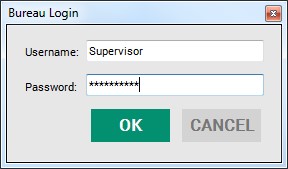
10. Once the Bureau Dashboard has been created it will create a default Logon which is User Name = Supervisor, Password = Supervisor.
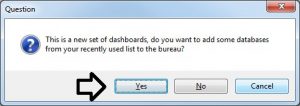
11. When prompted click “yes” to the above message so you can add some databases into the Dashboard.
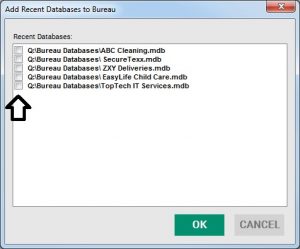
12. Tick all the databases you want to use in the dashboard and click “OK”.
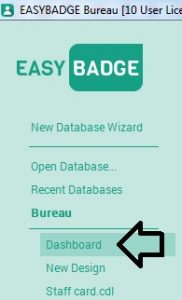
13. To open the Dashboard for the First time move the cursor to the left to lead the side fly out or click the main menu button and select Bureau > Dashboard and enter the Supervisor Log on details provided above.

To use the bureau dashboard once you’ve set it up, follow the instructions outlined below.
1.To open up the bureau dashboard, move your cursor to the left of the program window or click the menu button (three lines, top left corner). Now select Bureau > Dashboard.
2. Enter the Username and Password as “Supervisor”.
3. When the dashboard is open you have the following options available from the fly out menu on the left detailed below.
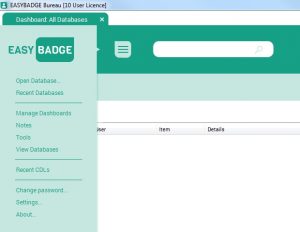
- Open Database = Open up and existing EasyBadge Database.
- Recent Database = View/Open a recent database.
- Manage Dashboards = Create Multiple Dashboards, add new Dashboard accounts and change main email account details.
- Notes = Opens up an EasyBadge Notepad for making notes.
- Tools = Read Smart card tool, Register Recent databases (to the Dashboard), Process Dashboard (ping cloud to check for updates.)
- View Database = View list of all databases registered with the current Dashboard.
- Recent CDL’s = View recently opened CDL (Card Design Layout) Files
- Change Password = Changes the Supervisor Password to log in to the current Dashboard
- Settings = The Main EasyBadge settings page
- About = details about the current version of EasyBadge installed.
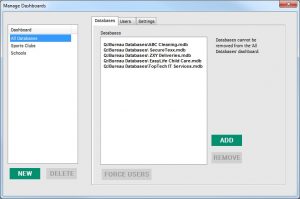
4. Under the Manage Dashboards > Databases tab you have the ability to create new Dashboards for different groups of databases, add new databases to a specific Dashboard and assign users and restrict access to certain Dashboards.
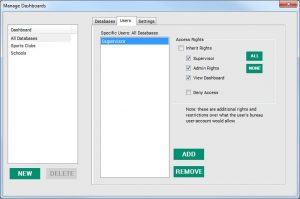
5. Under the Manage Dashboards > Users tab you have the options to manage new users that need to use the selected Dashboard.
6. To add a new user from the Manager Dashboard > User tab click Add > Add > Select Account Type and Enter User Name. Then click ‘OK’
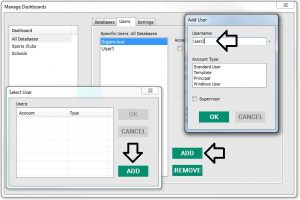
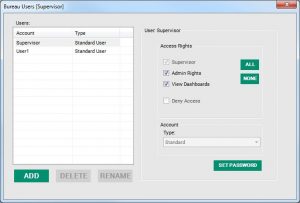
7. To manage Bureau Users, select Manage Dashboard > Users. From this page, you can add, delete, rename, manage access rights to new accounts and set the Dashboard passwords for these accounts.
8. To reset the overall bureau dashboard email password (which is linked to the cloud service that sends you email notifications) or alter email notification options click Manage Dashboard > Account.

Setting up different user accounts in EasyBadge is a simple process, but it’s important to remember there are two types of user accounts that can be created:
- EasyBadge accounts
- Windows accounts
Any account information that’s configured is held within the database you want to gain access to. The guide below outlines the process of setting up both types of account.
Setting up an EasyBadge user account
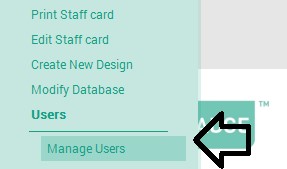
1. Click the main EasyBadge menu button in the top left of the program window.

2. Click ‘Users’ and then ‘Manage Users’.
3. Once you’re into the user management window, you need to highlight ‘Supervisor’ and tick the ‘Password required’ option and set a password. A Supervisor account is always needed if you want to create user accounts.

4. Next, disable ‘Authenticated Users’ and any windows domain accounts that appear in the list. The ‘Account Disabled’ is found at the bottom of the Access Rights list.
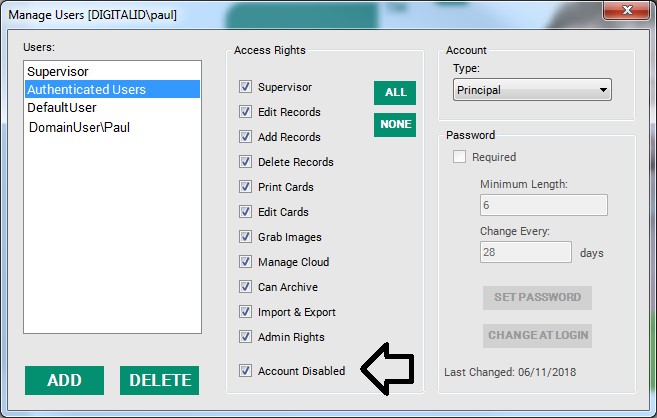
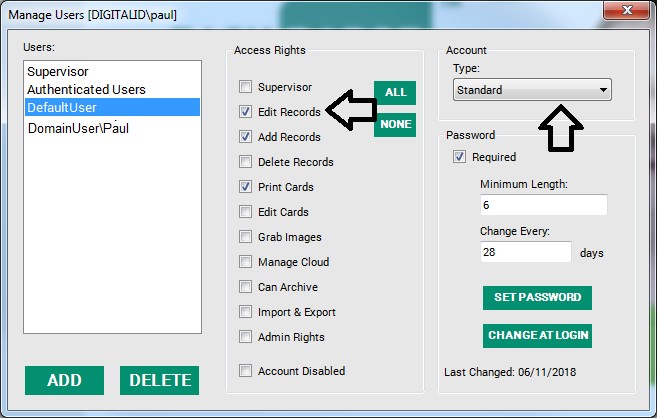
5. Now you can either select “Default User” or “Add a new user” with a specific name and configure the account as required.
- a) Tick/Untick the options you want to restrict/give access to.
- b) set Account Type to Standard
- c) make sure you set a password.
- d) Click the X to close the account options page when you are done.
Setting up a Windows authenticated user account
1. Click the main EasyBadge menu button in the top left of the program window.
2. Click ‘Users’ and then ‘Manage Users’.
3. Once you’re into the user management window, highlight ‘Supervisor’ and tick the ‘Password required’ option and set a password. A Supervisor account is always needed if you want to create user accounts.
4. Next, highlight ‘Authenticated Users’ and set ‘Account Type’ to Principal if it is not already set.
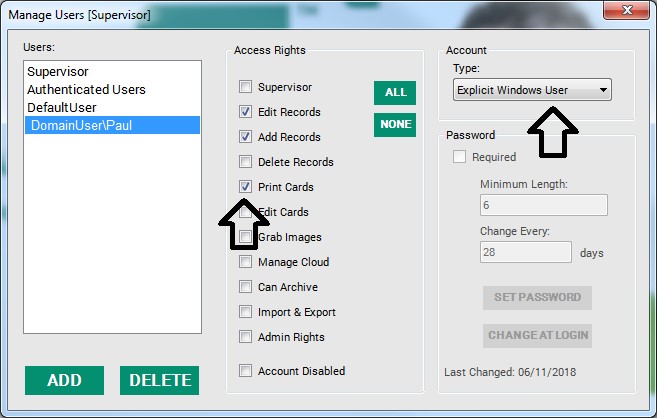
5. Now highlight the Windows user account and set which access rights need to be set. Then change the account type to ‘Explicit Windows User’.
6. When the Windows user logs in, they will now only have access to the features set in the access rights section of the user management panel.
NOTE: You can bypass the automatic login so you can log in as a supervisor, hold the ‘shift key’ when you open up the EasyBadge program to force a password attempt.
On this page you’ll find detailed instructions on how to set up an external ODBC connection in EasyBadge. EasyBadge allows you to connect to an external database using its ‘External Connection’ feature.
It’s important to understand how EasyBadge software works. Here’s a few things to keep in mind:
- EasyBadge always needs its own database creating before setting up an external connection. Once the EasyBadge database is set up you can set up the external connection from within this database and EasyBadge syncs the external data into its own table. This gives you more control over advanced databases and increases the print functions used in EasyBadge.
- EasyBadge provides methods for using cached query expressions so that remote data is only retrieved once from an external connection. This means that rather than running a query to retrieve individual fields, you can set EasyBadge to run a single query to return multiple fields. This speeds up data retrieval.
The following pre-requisites are required before setting up an external connection:
- You have an ODBC Data source that has already been configured in Windows for EasyBadge to connect to and the user has access to this and you know all the details about the name of the ODBC source.
- Any drivers for the external database (SQL, MySQL or Oracle drivers) are already installed and working.
- You have created an EasyBadge database instance which holds all the fields you need to sync. Please refer to the Configuring a custom database help topic.
- For easy of set up it is recommended any fields in the EasyBadge database have the exact same name as the source table or view.
- If you want to link to staff or student photos which are named uniquely in a network folder it is recommended you set up an image on Disk field which is details in the help section.
Creating the external ODBC connection
- Click the Menu button (top left)

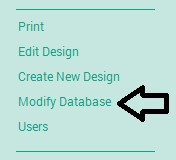
2. Click ‘Modify Database’.
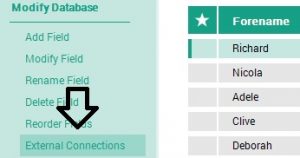
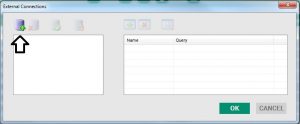
3. Click ‘External Connections’.
4. Click the ‘Create new Connection’ icon.
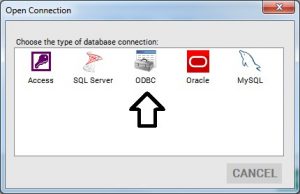
5. Click ‘OBDC’ Icon.
6. Enter the name of the ODBC Data source in ‘DSN’ and Click’ Test’ to check the connection. You should receive ‘Test Successful’, Then Click OK.
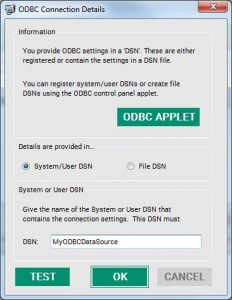
If your test was unsuccessful you need to check your ODBC Data source settings.
7. Click ‘Add Query’.
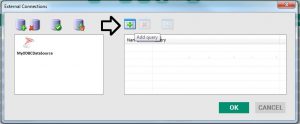
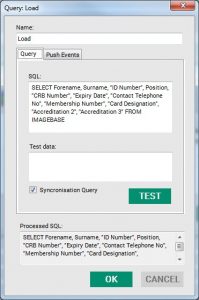
8. Name this first query ‘Load’ as below. In ‘SQL’ insert the SQL query that will load the data using SELECT and FROM statements. In this example the table being loaded from is call IMAGEBASE. Then tick ‘Synchronisation Query’ and click test to check it works.
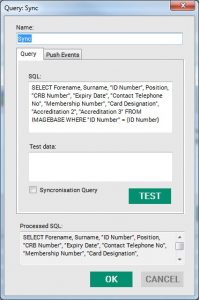
9. Repeat step 7 and 8 but this time name the query ‘Sync’. This query uses SELECT, FROM and WHERE Statements. Click the ‘Test’ button once then click ‘OK’.
Once you have completed this form click OK.
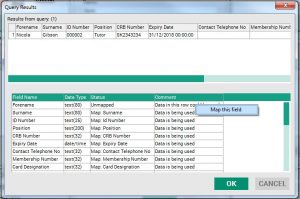
10. Now click the ‘Test’ button, on the query results page in the comments column click each different line and select map this field. The comment line will change to ‘Data is being used’, then click OK.
11. Now from the Main EasyBadge view click the Menu button top left

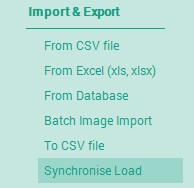
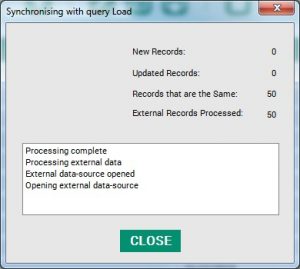
12. Next click “import & Export and “Synchronise Load” to trigger the Synchronisation of the query.
13. Once the Sync is complete you will see the below dialogue box and you can click “Close”.
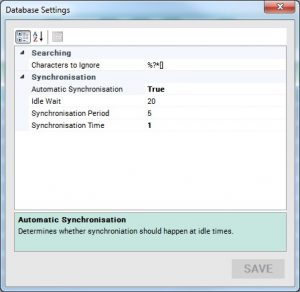
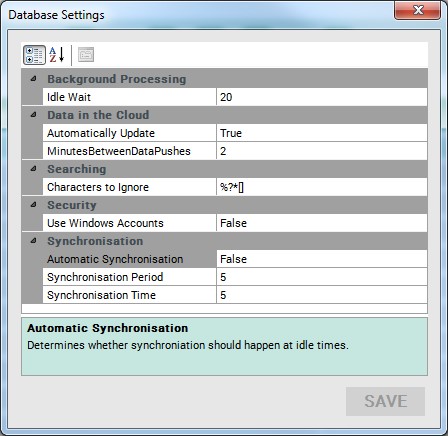
14. If you need to you can adjust the Database Synchronisation settings by clicking the Menu button > Modify Database > Database settings to view this dialogue box.
The ODBC data should now be synced into the EasyBadge SQL table ready for the user.
Changing the polling of an external connection in EasyBadge can be done by carrying out the following procedure.
1.Click into the main EasyBadge menu via the button in the top left-hand corner of the program.
2. Click ‘Modify Database’.
3. Click ‘Database Settings’. From here you can adjust the sync settings as shown below.
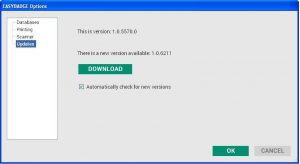
To keep your EasyBadge program up to date, it’s important to run the most recent version. You can run the update manually by following the steps below.
- Click the options button (three lines) at the top left of the program window.
2. Click on the Settings button.
3. If your EasyBadge install is not up to date, the latest version will be displayed. Click the download button, and you will be able to download the update.
If your computer fails or you’ve got a new PC, then you’ll need to reinstall your EasyBadge software.
Just to be clear, we’re assuming you have access to Easybadge software and backed up files from an Easybadge database.
- Collect your EasyBadge registration details by clicking the ‘main menu’ (3 lines top left of the program window) button top left.
- Click ‘Registration’ at the bottom of the menu.
- Write down or copy the company name and registration code exactly as they appear in the registration window.
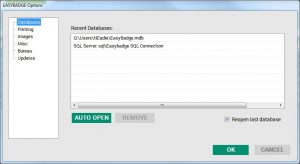
- Ensure you’re able to browse the location of any database (.mdb) files that EasyBadge needs to use on the new computer. These database files can be seen from the ‘Main Menu’ (3 lines top left of program window) > Settings > Databases
- Next, download the latest build of EasyBadge here and follow the software installation instructions in the attached pdf (page 8 to page 11).
- When EasyBadge runs for the first time it’ll start the Wizard. Click the “close Wizard” button top right of the Wizard screen.

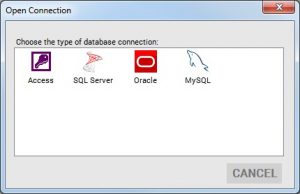
- Now move over to the left of the empty program window to make the menu flyout appear and select “Open Database” from the menu.
- Select the database format that matches your existing database. Access is the default type EasyBadge uses.
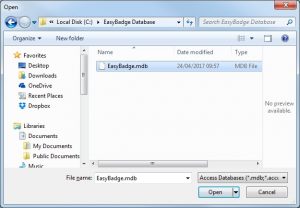
- You can now browse your existing database files and clip open to start using EasyBadge just as before.
- If you select a SQL or Oracle Database you will see this screen where you will need to enter your ‘Server’ and ‘Database name’ to open your existing database.
Remember if you’ve saved your EasyBadge data on your computer’s local drive and your computer malfunctions, you might need to recreate a brand-new database using the wizard.
Prefer to Talk?
Our team have more than 25 years of industry knowledge and are happy to help. We're available Monday to Friday, from 9am to 5pm.