EasyBadge: Designing your ID Cards
By adam on February 5th, 2020
The below instructions will guide you through the process of adding a card designation field into EasyBadge and the EasyBadge application.
1. Click on the main EasyBadge menu via the button in the top-left of the program window.
![]()
2. Click ‘Card Type’ on the dropdown and then click ‘Create’. Click ‘OK’ on the following two windows.
3. Click back into the main EasyBadge menu via the button in the top-left of the program window.
![]()
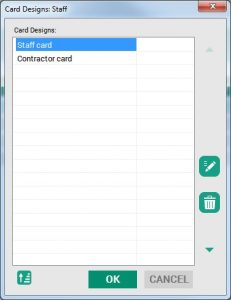
4. Click ‘Modify Database’ and then ‘Modify Card Designs’.
![]()
5. Enter a card reference in the ‘Card Type Value’. This can be the same as the card name.
6. Repeat Step 5 for all other card designs
7. Open the main EasyBadge menu and click ‘Modify Database and then ‘Modify Field’.
![]()
8. Select the ‘Card Type’ and change ‘Send to Cloud’ to ‘True’
Please note, you’ll need to pair your device to the database again for the update to be made on the app.
Adding an extra unique field to your EasyBadge database is a simple process. We’ve outlined the best way to go about it in the instructions below.
1. Click the menu button in the top left of the EasyBadge program window.
![]()
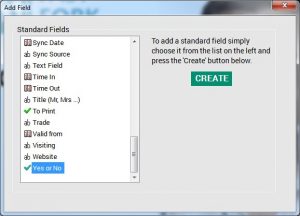
2. Click ‘Add Field’.
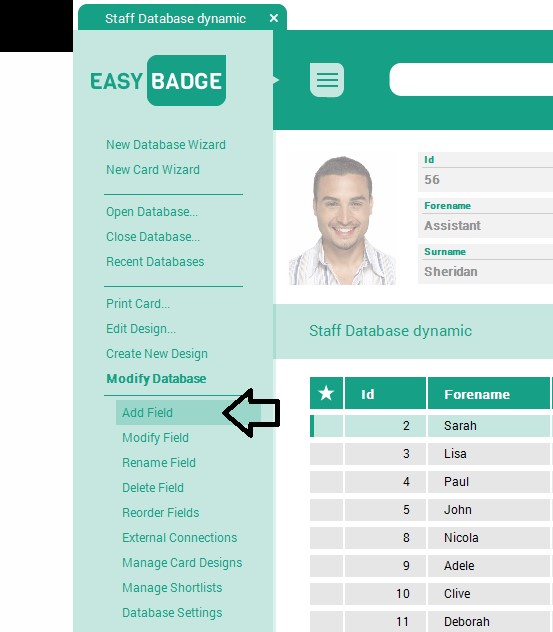
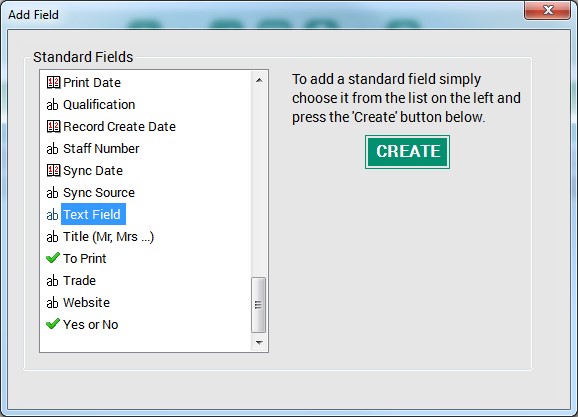
3. In the Add Field window, select ‘Text Field’ and click the ‘Create’ button.
4. Name the field according to your needs. In this example, we’ve used ‘Payroll Number’. Once you’ve done this, click ‘OK’.

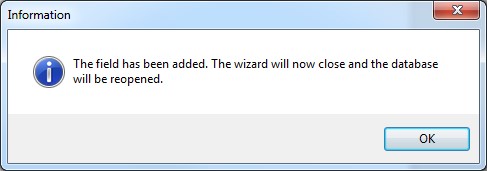
5. Your database will now need to close and reopen, so click ‘OK’.
6. You now need to change the properties field. Click into the main EasyBadge menu in the top-left of the program window.
![]()
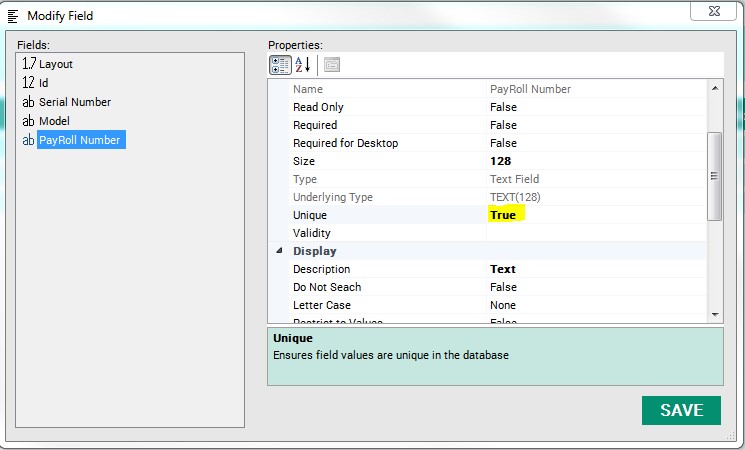
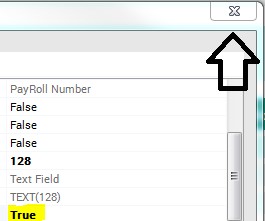
7. Select ‘Modify Database’ and then click ‘Modify Field’. Once you’re in the window, click on ‘Payroll Field’ and change the unique value to ‘True’.
8. Click on any part of the window to refresh the view, then click the ‘Save’ button. The changes will now be saved.
9. Click the ‘X’ in the top-right corner.
10. You’ve successfully added an extra unique field to your EasyBadge database.
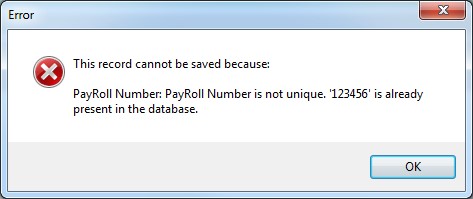
When you add a record, there’ll now be a field that holds the Payroll Field. Now, when you try to add a new record which has the same data in that field, you’ll be reminded by the above message.
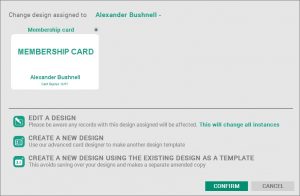
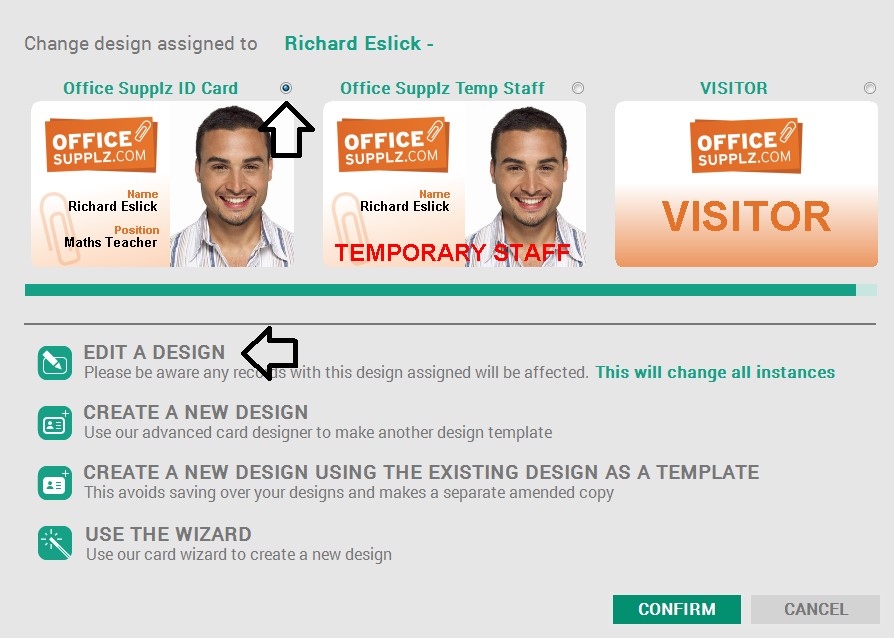
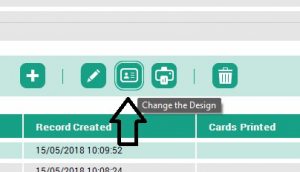
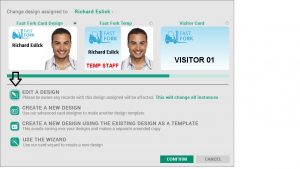
Changing and editing card designs with EasyBadge software is simple.
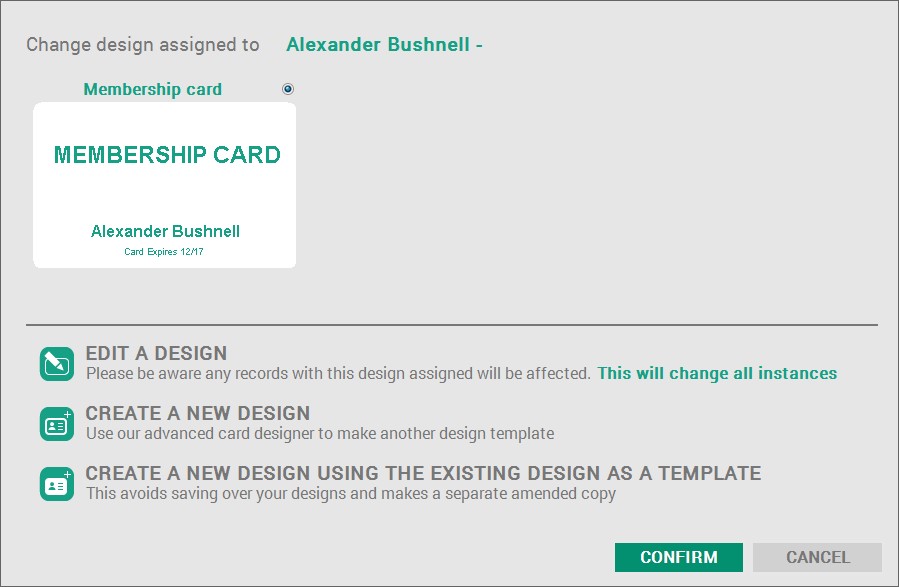
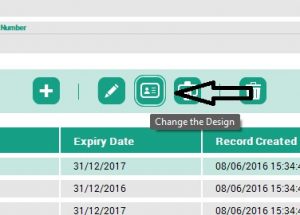
1. Click ‘Change the Design’ button

2. This will open a menu that allows you to change the design for that selected record, edit template designs or create a completely new design.
EasyBadge software allows you to quickly and efficiently create new ID card designs. You can add graphics, including logos to your design by following the steps outlined below.
1. Click ‘Change the Design’ button in the middle of the EasyBadge program window.
![]()
2. From this menu you can change the design selected by clicking “Edit a Design”.
![]()
3. Now click the new graphic button on the toolbar and browse to the file you need to load into your card design.
![]()
4. Click the logo you want to load and click the open button.
![]()
5. Move the object into position and click once to drop it onto the design area, then use the blue control points to resize the logo if needed.
![]()
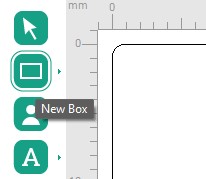
EasyBadge allows you to create ID cards quickly and efficiently, and you can add coloured boxes to your designs. The steps listed below outline how to do it.
1. Click the ‘Change the Design’ button in the centre of the EasyBadge program window as shown below.
2. From this menu, you’ll be able to change the selected design by clicking ‘Editing a Design’.
3. Click the ‘New Box’ button on the toobar. Move the pointer onto the cad design area and drag a box shape into your desired location.
4. The properties of the box will appear on the right-hand side in the properties panel so you can change the colour and effect of the box.
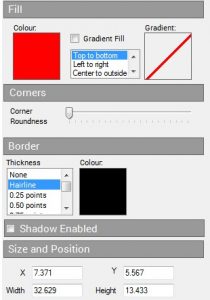
Key:
- Colour = Changes the primary colour
- Gradient = Secondary colour in a gradient
- Gradient fill = Enables the gradient
- Corner Roundness = Gives the box a rounded edge
- Border thickness = Adds a stroke to the edge of the box
- Shadow Enable = Adds a simple shadow effect
- Size and Position = Sets the co-ordinates for the position of the box
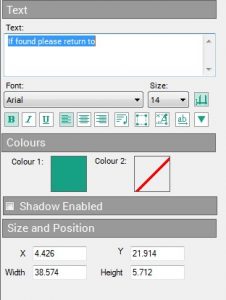
EasyBadge gives you flexibility with your ID card designs, with various text formatting options available. In this article, we’ll run through the main text formatting options on offer and how to implement them on your card designs. To format text on your card design, just follow the steps below.
1. Click ‘Change the Design’ button in the middle of the EasyBadge program window.
2. From this menu, you can choose the design you want by clicking the bullet point to the top right of the card preview and clicking ‘Edit a Design’ as shown below.
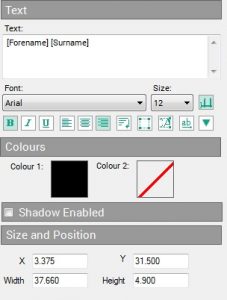
3. Next, click the text object you want to format. Once selected the text box will have blue control points around it. This allows you to drag it to a new position if required.

4. The text formatting options for the selected text box will appear on the right-hand side in the properties panel. In the example below, the fields ‘forename’ and ‘surname’ are linked by using square brackets. For example [Forename] [Surname].
5. Here’s a full list of text formatting options for EasyBadge. They’re each explained below.
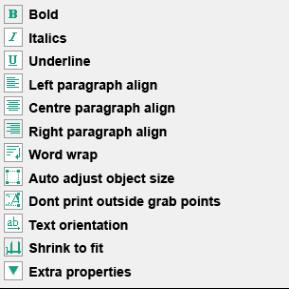
- Bold, Italics, Underline = Change the visual formatting of the font.
- Left, Centre, Right paragraph Align = Position the text within the bounding area of the text box.
- Word Wrap = Nudges text onto a new line, this is useful of you are trying to print long job titles and the font needs to stay the same point size.
- Auto Adjust Object Size = Changes the bounding box to accommodate a longer text string
- Don’t print outside grab points = Crops any text off so it is not displayed outside the bounding area of a text box.
- Text Orientation = Rotates text 90, 180, 270, degrees on the design area.
- Shrink to fit = Reduces the point size of the text to so it fits within the bounding box. This is useful of you always want long text strings like job titles to appear on one line.
- Extra Properties = These settings allow you to further adjust the vertical and horizontal line spacing for a paragraph of text.
- Colour 1 = Changes the main colour of the selected text.
- Colour 2 = The colour of the shadow if you use the shadow option.
- Shadow Enable = Creates a basic drop shadow effect on text.
- Size / Position = Allows you to specify exact co-ordinates of the position of text on the card.
- Note: When adding any text box to the design always make sure the bounding box fills the full area available on your design to print the line of text. This ensures long names and titles get formatted correctly. It is a good idea to test your template by adding a long name and job title to a record to ensure the formatting will be correct.
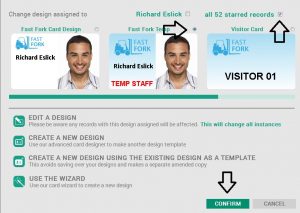
To change your ID database and records to a new design and set it as the default in EasyBadge, carry out the steps as outlined below.
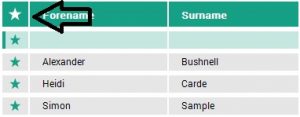
1. First, press F5 on your keyboard to activate a split view. Pick the design and then tick ‘All starred records’ and click confirm.

2. Star ALL the records in the database by clicking the star on the table header.
3. Next, click the ‘Change the Design’ button in the centre of the screen.
4. Now pick the design they need to be, tick ‘All starred records’ and click ‘Confirm’ to set them all to that design as below.
5. This changes all the records to the design you have set. You can now set this as your default design by clicking Main Menu > Modify Database > Manage Card Designs.
6. Click on the design that needs to be the default design and use the up arrow on the right to move it to the top of the list. The design at the top of this list is assigned to any new records that are added.
EasyBadge software allows you to add a toggle ‘on/off’ fields to your card design. This guide explains how to apply one.
1.Click the menu button in the top left of the EasyBadge program window.
![]()
2. Click ‘Add Field’.

3. Select ‘Yes or No’ and click the ‘Create’ button.
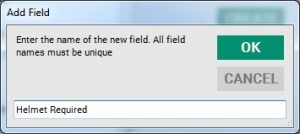
4. Name the field so it describes the icon or text item you want to turn on or off. Below, we have used ‘Helmet Required’ as an example. Click ‘OK’ after you’ve set the name.
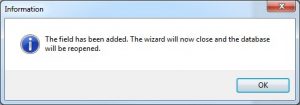
5. At this point, the database will need to close and re-open, so click ‘OK’.
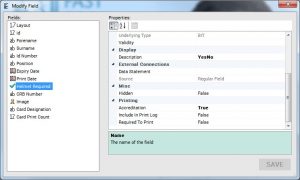
6. Next, click the menu button again and select modify field and select the field you just added. In the properties table, change ‘Accreditation’ to ‘True’. Click on another line to refresh the page, and then click ‘Save’.
7. Click the ‘Change the Design’ button.

8. Next, select the design you need to edit and click the ‘Edit this Design’ button.
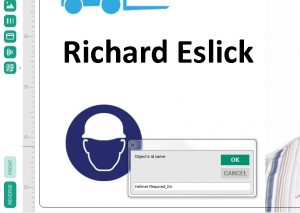
9. Now, add your desired object (text box, barcode, graphic or image box) on to your design and position it where you want it to appear. Then right-click the object and select ‘id’ from the menu.
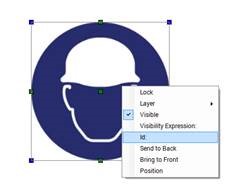
10. If your field is called ‘Helmet Required’ as it is here, you should enter ‘Helmet Required On’ in the ID properties box like in the example below.
11. Now, click the ‘Save the Design’ icon.

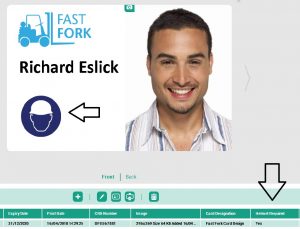
12. From here, every time you edit a record and check the field to ‘Yes’ or ‘No’, the icon/object/image/barcode should appear or disappear as required.
EasyBadge allows you to adjust the aspect ratio of images on card designs. When you’re in the ‘Card Design’ application, the card’s properties will appear in the right-hand pain. Make sure to select ‘Free’ in the aspect ratio drop-down; this will enable you to alter the image box to suit the blank area on the card.

Whether you’re using a single-sided or dual-sided ID card printer, many people will want to print on the reverse of the card. To set this up using EasyBadge software, follow the steps below.
1. Open up your design by clicking ‘Change the Design’ button.
2. Click the green ‘Edit a Design’ button.

3. From the design view, click the ‘Options’ button (white box with three lines in the top left of the screen).
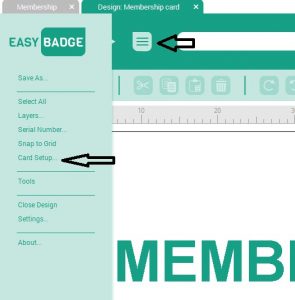
4. Next, click ‘Card Setup’.
5. Click the ‘2 sided design’ box and click OK. You’ll now be able to select ‘Reverse’ in the bottom left of the card.
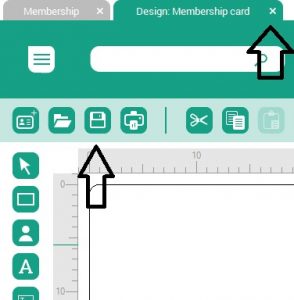
Finally, click the ‘Save’ disk and then the small ‘X’ to close the card design when you have finished adding the required information to the reverse of the card.
Adding a variable field to your card design is simple with EasyBadge. We’ve outlined the process below.
1. Click ‘Change the Design’ button.

2. From this menu, you can edit a design by bullet pointing the design you wish to change. Once you’ve selected the appropriate design, click the ‘Edit a Design’ button.

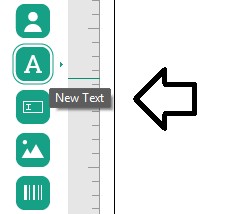
3. When your design is on the screen, click the ‘New Text’ icon on the left toolbar and drop the textbox onto the card design.
4. To add text, type the static text into the panel to the right of the card design area.
5. Other options for formatting text can be found below the font selector, as well as ‘Shrink to Fit’, ‘Word Wrap’ and others.
6. Once you’re happy with your design, click the ‘save’ icon on the toolbar to and then click the small ‘X’ to close the card design once you’ve finished adding the new data fields to the card.

Once this is complete, you can also use the ‘New Text’ or ‘A’ button on the left-hand toolbar to add other variable data.
EasyBadge has a zero-suppress function which removes leading zeros from data that appears on cards. This includes membership numbers, staff numbers and barcodes.
The information below outlines how to add a zero suppress function.
1. In the card design window, click ‘Change a Design’ and you’ll be given the option to edit or create a design. Select the design you want to add a zero suppress function to.
2. Click on the ‘A’ Text box or barcode you want to use the zero suppress function on so you can see the properties on the right-hand panel. You need to add [Int] to your field formatting to apply the function.

In the above example, we’ve used the staff number field: [Int(StaffNumber)] This turns 00012345 into 12345 when displayed on the card design. The picture below shows the zero suppress function in action.

If your card is not printing centrally on a retransfer printer you can adjust the card print offsets in the card design template.
To adjust a card design’s offsets from your EasyBadge database, follow the steps outlined below.
1. Click ‘Change the Design’ button.

2. From this menu, you can bullet point the design you want to edit and click the ‘Edit a Design’ icon.

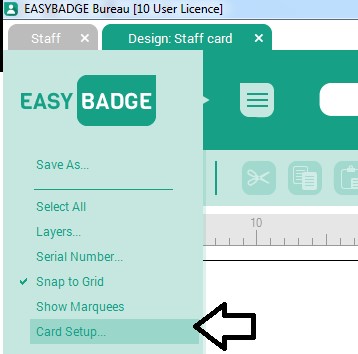
3. From the design program window, click the menu icon in the top left corner.
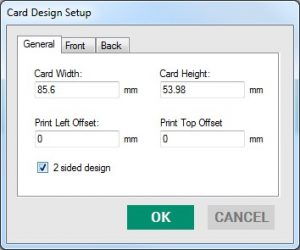
4. Select ‘Card Setup…’
5. From the card design setup dialogue, set the ‘Print Left Offset’ and ‘Print Top Offset’ to -2.
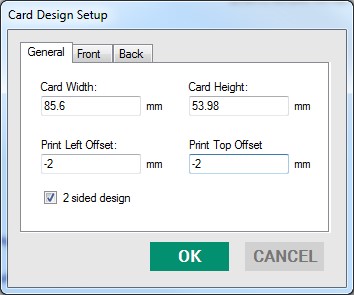
This adjusts the print position, compensating for the larger area of a retransfer printer. If the image is not central, try different settings until the image is centralised.
Prefer to Talk?
Our team have more than 25 years of industry knowledge and are happy to help. We're available Monday to Friday, from 9am to 5pm.